With the rapid development of LED technology, it has become more and more common to gradually replace DLP, LCD splicing and projection products from large-spacing outdoor products to indoor close-to-view LED displays. Especially under the rapid development of the current smart city and security industry, and under the background of the current development of digital enterprises and the digital era, the demand for indoor display hardware is increasing.
Many customers will ask the question of “daily maintenance and maintenance of small-pitch LED display”. Therefore, the technical support staff has summarized the following dry goods for your reference.
First, the maintenance of the screen/screen
2. Routine maintenance
It is recommended that you check the ambient temperature and humidity of the display every day.
Use the display screen and supporting equipment at least 2 times a week for 2 hours each time; If you do not use the display for 14 consecutive days, preheat the display before using it again.
To achieve the best display effect, you are advised to use an ESD soft brush every month to clean the dust on the display surface.
Check the components of the power distribution box every quarter, check the contact stability and security of the power signal cable of the display screen, and check whether the display screen is properly grounded.
Check the rigidity of the steel structure every year.
3. Not used for a long time – Preheating operation If you do not use the display for 14 consecutive natural days, please follow the following instructions before using it again. The following prestored screen Settings need to be set when you click the screen for the first time, this setting is only for the warm-up operation, if the display is used frequently, the following operations are not required. Select a pure black background picture, set the startup screen time to 60 seconds, and set the display of the pre-stored screen when the network cable is disconnected and there is no DVI signal, and finally save it to the hardware.
Figure 1- Presave screen Settings
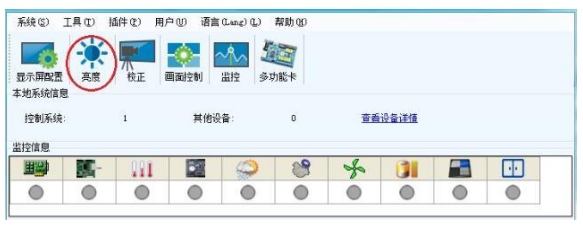
Figure 2- Advanced User main window
Click “Brightness” in the main window to enter the brightness adjustment, select “Manual adjustment”, pull the pull rod of “brightness adjustment”, and adjust the brightness to 26 (brightness value about 10%), as shown below:
Figure 3- Manual adjustment
Note: This operation is recommended to be completed within 60 seconds.
Figure 4- Screen control
Back to the main window, click “Screen Control” to enter “Display Control”, select “Self-test” as “white”, and click “Send” to complete the operation, as shown below:
Figure 5- Display control
Display brightness and aging schedule. Adjust the display brightness and the corresponding aging time step by step.
No. Display brightness aging time
1 10% 1H
2 30% 2H
3 60% 2H
4 80% 2.5H
5 100% 0.5H
4. Common faults and solutions
(1) Module dead lights or broken lights
The reason:
A dead lamp below 50ppm is a normal dead lamp phenomenon.
Bump lights during installation, and accidentally knock lights during use.
Maintenance method:
Replace the problem module with a spare module.
Upload the correction data of the corresponding spare module in the U disk.
Indicate the reason for the repair on the replaced module, and the exact coordinate position of the module in the large screen must be marked.
(2) Module color bar
What HAPPENS:
Abnormal vertical bar color appeared in the module: high, dark, steady on, red, green and blue color abnormal.
Cause: The module chip is abnormal, the column of a lamp bead internal short circuit, PCB board line short circuit, extrusion between modules.
Maintenance method:
Replace the problem module with a spare module.
Upload the correction data of the corresponding spare module in the U disk.
Indicate the reason for the repair on the replaced module, and the exact coordinate position of the module in the large screen must be marked.
(3) Color blocks/color bars appear in the module
Symptom: A rectangle/strip color anomaly appears on the module.
Cause: An IC on the module is abnormal.
Maintenance mode:
Replace the problem module with a spare module.
Upload the correction data of the corresponding spare module in the U disk.
Indicate the reason for the repair on the replaced module, and the exact coordinate position of the module in the large screen must be marked.
(4) The module has no correction data
Phenomenon: According to the unit of the module, the phenomenon of flower screen/Mosaic, or gray hair.
Cause: The module does not upload correction data or the correction data is lost.
Maintenance mode:
Re-upload the correction data of the module. The latter uploads the correction data of the whole screen.
You can also choose to temporarily turn off the correction.
(5) Module signal/power connection is abnormal
Symptom: The black display of a single module is not displayed or is incomplete.
Cause: The 5V power cable and signal bar of the module are improperly connected.
Maintenance method: Remove the module and connect the 5V power cable or bar cable.
(6) The receiving card (or HUB board) function is abnormal
Symptom: The display of a single container is abnormal or not displayed.
Cause: The receiving card or HUB board of the container is abnormal.
Maintenance method: Replace the faulty HUB board.
(7) The power connection is abnormal
Symptom: A black screen is displayed in the load area of the power cable (the signal indicator on the back is off).
Cause: No power supply.
Maintenance method: Check whether the power cable is powered off due to short circuit or overload, and then switch on the power.
(8) The network cable is improperly connected
Symptom: The on-load area in the unit of the network cable is not displayed (the power supply is properly connected).
Cause: Network port signals are abnormal.
Maintenance method: Check whether the network cable connection or network port is normal.
(9) The brightness of the whole screen is inconsistent
Symptom: The brightness of the entire screen is inconsistent.
Cause: The configuration files are inconsistent.
Maintenance method:
Send the correct configuration file to the full screen.
Reset the brightness Settings for the entire screen.
(10) The overall configuration file of the large screen is faulty
Symptom: No display is displayed or the display is disorganized.
Cause: No configuration file exists or an error occurs in the configuration file.
Maintenance method:
Import the correct configuration file to the full screen.
(11) Determine the abnormal display by the indicator light of the receiving card inside the box
5, LED small spacing moisture and dehumidification
Daily check whether the ambient temperature ≤ 30 ° C and humidity ≤ 60%RH meets the working conditions.
Use the display screen and supporting equipment at least 2 times a week for 2 hours each time; If you do not use the display for five consecutive natural days, preheat and dehumidify the display before using it again.
LED display moisture proof – waterproof ≠ moisture proof
Moisture-proof is moisture-proof gas and moisture. The packaging material of LED display device is mainly epoxy resin and other plastic material, plastic belongs to polymer material, the gap between polymer material molecules is large, vapor water molecules can penetrate into the shell through the gap LED products are moisture-sensitive components, products in the process of use will slowly absorb moisture.
LED display moisture resistance -LED moisture absorption characteristics
Temperature ≤30℃, humidity ≤60%RH environment, small pitch product LED hygroscopic characteristics curve:
LED display moisture -LED display device moisture hazards
LED display device moisture, water vapor into the device, when the air containing halogen water vapor into the device inside, in the case of power, the halogen in water vapor and the metal in the device will occur electrochemical reaction, serious cause the chip short-circuit leakage or electrode drop, resulting in the display device blind light and bright abnormal.
LED display moisture-proof – LED device storage
When the LED device is transported and stored, the height of the object can be used to prepare for waterproof and moisture-proof. At the same time, the storage environment of LED devices is equally important, and it is recommended to monitor temperature and humidity. The best storage environment is: temperature < 30℃, humidity < 60%RH, desiccant should be added during transportation and storage.
LED display moisture proof – Spare module /HUB/ receiving card packaging
Spare modules, hubs, receiving cards, etc. are vacually packed or sealed and desiccanted.
LED display moisture-proof – indoor dehumidification
Physical dehumidification method: in the room to prevent quantitative desiccant, reduce the moisture in the air.
Moderate ventilation: Ensure that the weather is not humid, and there is wind in the case of moderate ventilation to accelerate the evaporation of water vapor, reduce the relative humidity of the indoor environment.
Air conditioning dehumidification method: Air conditioning dehumidification can be used in humid weather to reduce the moisture rate.
Use a specialized dehumidifier for dehumidification.
LED display moisture – dehumidification of the screen body in use
After the screen is installed, it is necessary to light up and use frequently. If the display is not used for a long time (generally 5-10 days), dehumidification treatment should be carried out before use, and the accumulated moisture in the screen body should be removed by gradually increasing the brightness and slowly heating up, and the brightness should be gradually increased.
No. Display brightness aging time
1 10% 1H
2 30% 2H
3 60% 2H
4 80% 2.5H
5 100% 0.5H
Precautions when using LED display – Disinfectant!!
Please be careful to use 84 disinfectant containing (chlorine, bromine), highly effective disinfectant water, etc., directly spray and disinfect the storage, production and use environment of LED. Our commonly used disinfectants are mainly 84 disinfectant, ethanol (alcohol) disinfectant, bromine disinfectant water, chlorine dioxide disinfection tablets, quaternary ammonium salt disinfectants (Germinate) and so on. The above disinfectants can be used to disinfect surfaces such as desktops and floors. However, the use of chlorine-containing 84 disinfectants, bromine disinfectants, and chlorine dioxide disinfection tablets may cause corrosion to our LED display and lamp beads.
Screen dust/miscellaneous
To achieve the best display effect, you are advised to use an ESD soft brush every month to clean the dust on the display surface
As technology matures and costs decline, the application of small-pitch leds in commercial display markets such as conference rooms, education, shopping malls and movie theaters will become more common, and the daily problems and maintenance of products will become more important, not only to ensure the work efficiency of the use unit, but also to extend the service life of the product.